Creating Video-Based Education
Technology Enhanced Education collaborates with UCSF faculty to produce video lessons for the School of Medicine’s curriculum. We incorporate these lessons into the curriculum using a blended learning strategy that allows students to learn some of the content at their own pace and on their own time. These lessons are increasingly important in the delivery of medical education at UCSF and we have produced several hundred thus far.
TEE supports faculty in the development of videos in two ways: studio-recorded video lessons and screencast lessons recorded on a desktop or laptop computer. Both lesson types may be a single video, or several sequential videos, that teach a concept or task. These digital lessons are a departure from the classroom lecture setting because students can speed up, slow down, or pause the videos. They can also review sections or re-watch the entire video at any time.
Video Studio Lessons
The content of our video lessons is developed and determined by a faculty member who also appears on-camera, presenting the material. The filming and editing process is often done in collaboration with Educational Technology Services (ETS). The majority of our videos are staged and filmed in the ETS on-campus studio, but we do occasionally film projects in other locations that are essential to the content (e.g. a clinic or laboratory).
TEE invests enthusiastic effort into our partnerships with faculty in planning and producing these video lessons. These differ from screencast lessons because the faculty member speaks on-camera and filming takes place in a studio environment (in some cases, a lab or clinical setting).
We have outlined our process for School of Medicine faculty and staff below.
More information:
The Process (in 4 Parts)
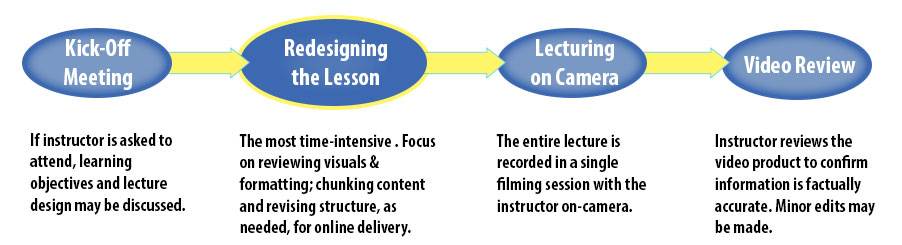
Part 1: Kick-off Meeting for the Course
Lesson planning begins with a kickoff meeting for all videos in the course, where we work with course directors in the School of Medicine to identify which lectures will be transformed into video lessons. This process should ideally begin about 6-8 months before a course launch.
This is a ‘big picture’ meeting that includes the course directors and instructional designers from the Technology Innovations Team. Once lectures are identified, we will review the overall time commitment (see table at bottom of this page). We also work with course directors to ensure that lecturing instructors can commit adequate time to developing their lessons for video.
Part 2: Lesson Redesign Meeting(s)
The Instructional Designer and the instructor who is developing the content for a lesson, meet to discuss how the lecture will be transformed for video. The meeting focuses on evidence-based pedagogical strategies for video and asynchronous learning, as well as establishing the project timeline. The instructor leaves the meeting with the knowledge necessary to develop and modify lecture materials for the filming.
After the meeting, the instructor makes revisions, including changes to the structure, format and visual materials. The instructional designer and the Technology Innovations team are always available for additional feedback or meetings throughout this process.
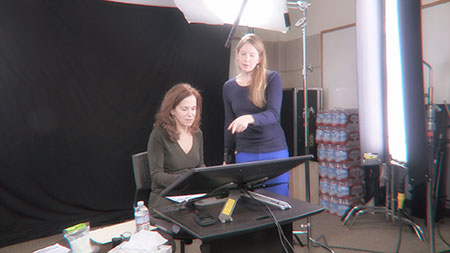 Part 3: Filming
Roughly a week prior to the filming date, the instructional designer checks in with the instructor about the lesson and provides reminders and tips for a successful filming session. The instructional designer is also present at the filming session to coach and support the instructor.
Part 4: Post-Production and Online Integration
The editing process usually takes 2-3 weeks. After some technical reviews, the final versions of the videos are shared with the instructor to review and approve. Edits are limited to situations where the information presented is factually inaccurate. Corrections are made to omit or modify these segments with an emphasis on fixing (without reshooting) video. Captions and transcripts for the videos are generated, and the videos are posted as a playlist within the CLE.
Screencast Lessons
Screencast lessons are video-based lessons that are recorded on a computer by the instructor. The recording shows what happens on the screen and includes narration captured with a microphone. At UCSF, the Technology Innovations Team supports instructors who are tasked with creating screencast lessons for use in the curriculum. In this format, the instructor is not featured on-camera; the visuals on the screen are driving the presentation. The flexibility of this method allows instructors to record lessons from their office or home and according to their own schedule.
The lesson can present anything that is viewable on the instructor’s computer screen (PowerPoint file, website, software program). To record a lesson, the instructor will also need a microphone and a software program that records the screen actions. Technology Innovations Team can help guide an instructor towards the appropriate software solution that best meets the instructor’s skill level and goals.
Screen lessons involve several stages which include lesson planning, lesson recording, and publishing (or sharing) the screen lesson so that students can access it:
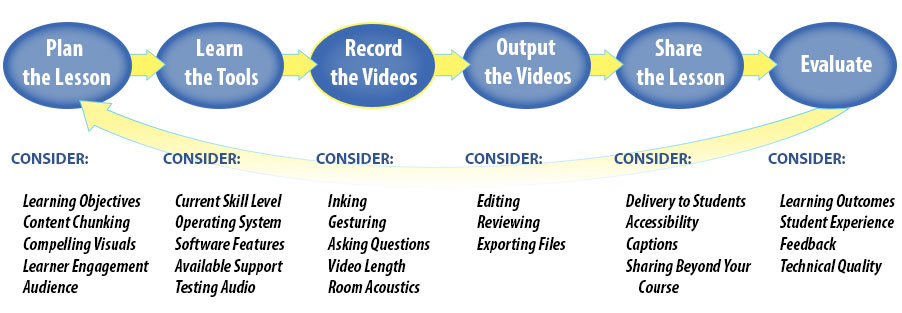
These stages, and a variety of supporting materials, are covered in more detail in our Screen Lessons 101 course.
Recording and Editing
Faculty can record and edit screencast lessons with a variety of commercially available software programs, including Screenflow, Articulate, and Captivate. Most of these are platform-dependent (some available on PC and some on Mac).
Software
Please contact us at [email protected] if you would like to work with us.
Microsoft Powerpoint's Recording Features (PC users only)
![]() PC Users of the latest version of Powerpoint for Office 365 can take advantage of new recording features built directly into the program. Now inking capabilities are supported with a stylus for touchscreen or a mouse. The inking actions and audio tracks are recorded directly inside of PowerPoint, and video files can be exported from Powerpoint with these new features.
PC Users of the latest version of Powerpoint for Office 365 can take advantage of new recording features built directly into the program. Now inking capabilities are supported with a stylus for touchscreen or a mouse. The inking actions and audio tracks are recorded directly inside of PowerPoint, and video files can be exported from Powerpoint with these new features.
Screenflow by Telestream (Mac users only)
 Screenflow not only records the actions onscreen -- it also offers a robust set of intuitive timeline-based editing features. Recent versions of Screenflow allow you to screen capture from your iPad. ScreenFlow saves files in a variety of file formats.
Other Software Programs
 Some software programs that you may already be using to view video files may also have basic recording and editing capabilities. For example, Mac users can use QuickTime Player to create screen recordings via the menu option (a feature not available to PC users). The user can capture the entire screen, or define the specific area of the screen to be captured (e.g. just the web browser window). The main file format produced is MOV or M4V. Note that depending on length of your final video, the file size can be very large and may require further processing to make it small enough to share online.
The UCSF library has screencasting software available on several of the multimedia workstations available in the Tech Commons. Some of these computer workstations have Camtasia, which offers a rich feature set similar to Screenflow. If you are looking for a robust software program that offers more than just screencasting capabilities, consider Articulate Studio. With Articulate Studio, the user can also integrate interactive quizzes, story branching points, and more.
Tip: You can embed movie files directly into PowerPoint slides on both Mac and PC. Different versions of PowerPoint accept different video file types, so make sure to check that your file type is compatible with your version. If you embed media into your PowerPoint it is important that you keep all of your source files in a folder with your PowerPoint file, or you risk opening your PPT to find your media files are missing.
Teaching With Video
Part of our collaboration with instructors involves encouraging you to think about ways to make your videos more interesting. Below we’ve featured several examples to illustrate ways to capture the attention and hold the interest of your learner.
Additional Resources
Screen Lessons 101 - This Moodle course is designed help School of Medicine faculty plan, prepare, record and output screen lessons for the online curriculum component in the School of Medicine.
Screenflow Video Tutorials - if you have decided to learn Screenflow on your own, Telestream offers a number of video tutorials that go beyond the scope of our Screen Lessons 101 course.
UCSF Tech Commons - The Staff in the Tech Commons are knowledgeable on a variety of technology solutions and offer support for some of the screencasting programs discussed herein. You can contact them for support and great customer service.
